This document guides you through setting up, configuring, and managing the Hashicorp integration.
Prerequisites
- Gateway should be connected to the OpsRamp portal.
- The vault should be accessible to the gateway.
- OpsRamp Classic Gateway 12.0.0 and 12.0.1 (or) OpsRamp NextGen Gateway - these gateway versions support console launching.
- OpsRamp Classic Gateway 21.1.0 supports
discovery and monitoring.
Configure and Install the integration
From All Clients, select a client.
Navigate to Setup > Account.
Select the Integrations and Apps tab.
The Installed Integrations page, where all the installed applications are displayed. Note: If there are no installed applications, it will navigate to the Available Integrations and Apps page.
Click + ADD on the Installed Integrations page. The Available Integrations and Apps page displays all the available applications.
Search for Hashicorp using the search option available.
Note: Alternatively, you can use the All Categories option to search.Click ADD on the Hashicorp tile.
In the Add Hashicorp page, enter the BASIC DETAILS:
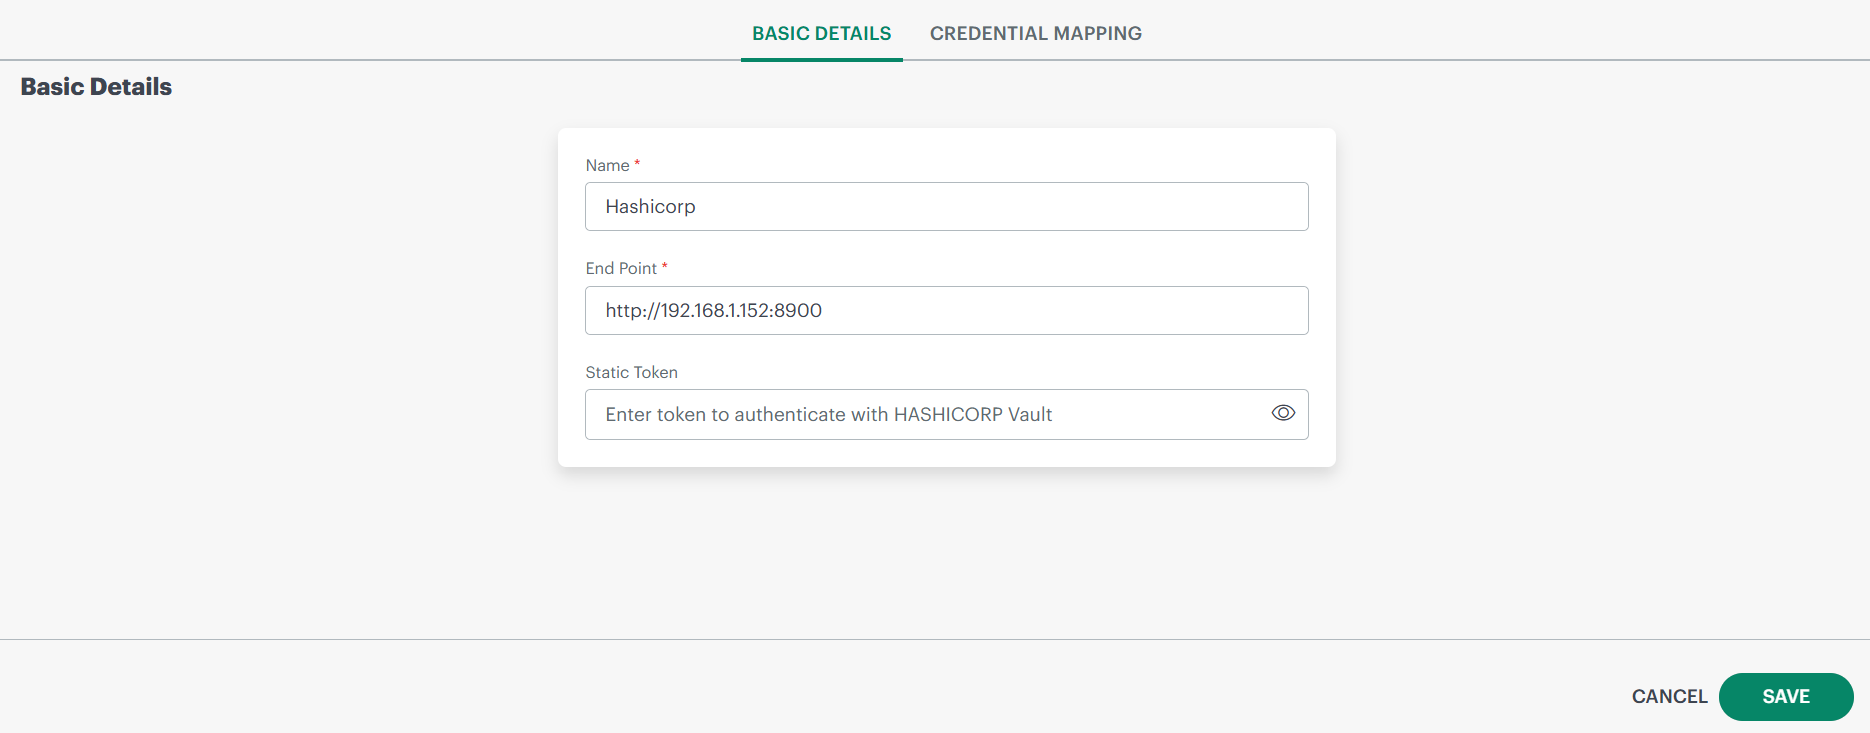
- Name: Provide a name for the integration.
- End Point: Enter the Hashicorp Vault API server IPAddress/HostName and Port.
Example:http://192.168.1.152:8200 - Static Token: Provide the token. This token is static.
Click NEXT. The CREDENTIAL MAPPING page is displayed.
Click +ADD.
Enter the details to add a credential mapping. This credential mapping is created to fetch the required secret details from the vault.
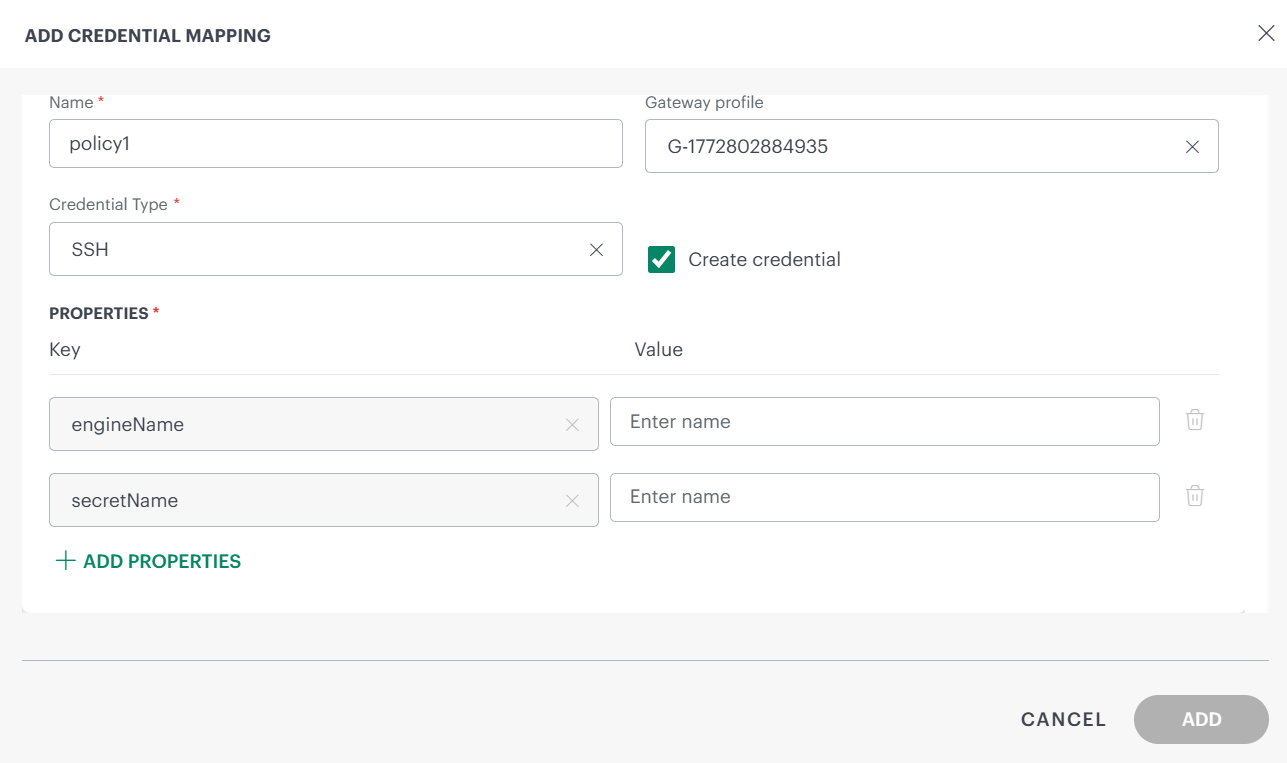
Name: Enter the name for the policy.
Gateway profile (optional): Select the appropriate gateway profile to connect to the vault. Gateway will fetch all details from the vault.
Credential Type: Select the appropriate credential type: SSH or WINDOWS. This credential will be used to log in to the console.
PROPERTIES: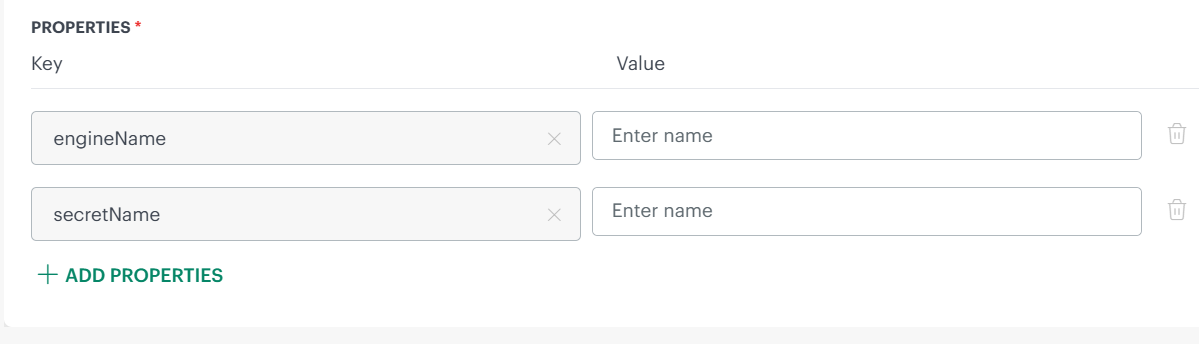
Based on the credential type selected the values in the Property fields vary slightly.
Enter the values (from the vault) against the OpsRamp properties
engineNameandsecretName. These property keys are mandatory. You cannot delete these keys.- Click +ADD PROPERTIES to select other properties like Username, Password, PrivateKey, etc. and enter the values.
- Click the delete icon if you want to delete an entry.
Select the Create Credential option, if you want the credential created automatically. You can view the credential on the Credentials listing page (as: VAULT-“name of policy”). Example: VAULT-
policy1Click ADD. The policy mapping details are saved.
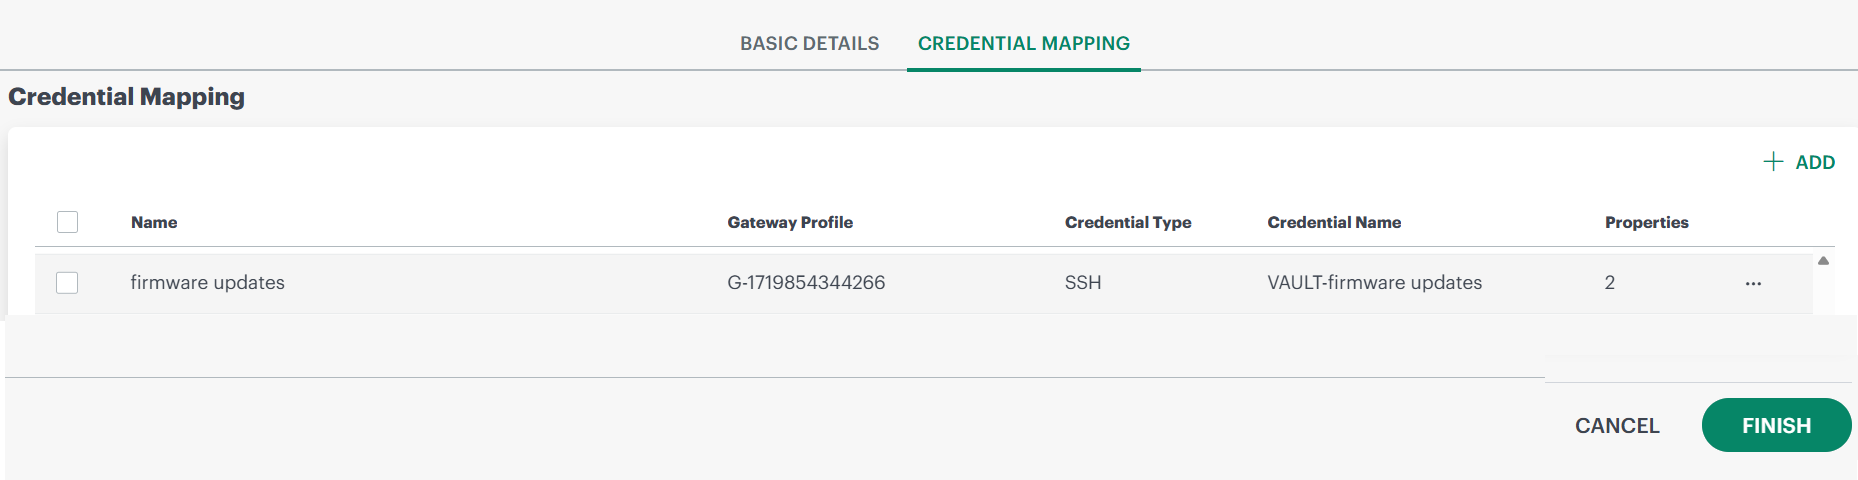
Click +ADD on the Credential Mapping listing page, if you want to add multiple credential mappings.
Actions
You can perform the following actions on the Credential Mapping listing page:
- Hover over the credential mapping name, click the three dots, and select the appropriate option.
- Edit: Click to make changes to the policy.
- Remove: This will permanently delete the mapping.
- Sync Credentials: This will resync the selected credential mapping with the latest configuration.
- Copy Credential ID: To copy Credential ID to the clipboard.
- Hover over the credential mapping name, click the three dots, and select the appropriate option.
Click FINISH. The app is installed and appears on the Installed Integrations page.
Actions on integration
Following are the actions you can perform on the integration:
Edit
This option allows you modify the Basic Details and Credential Mapping pages.
Follow these steps to modify:
- Mouse hover over the integration and click the three dots (action menu).
- Select Edit. The Basic Details page is displayed.
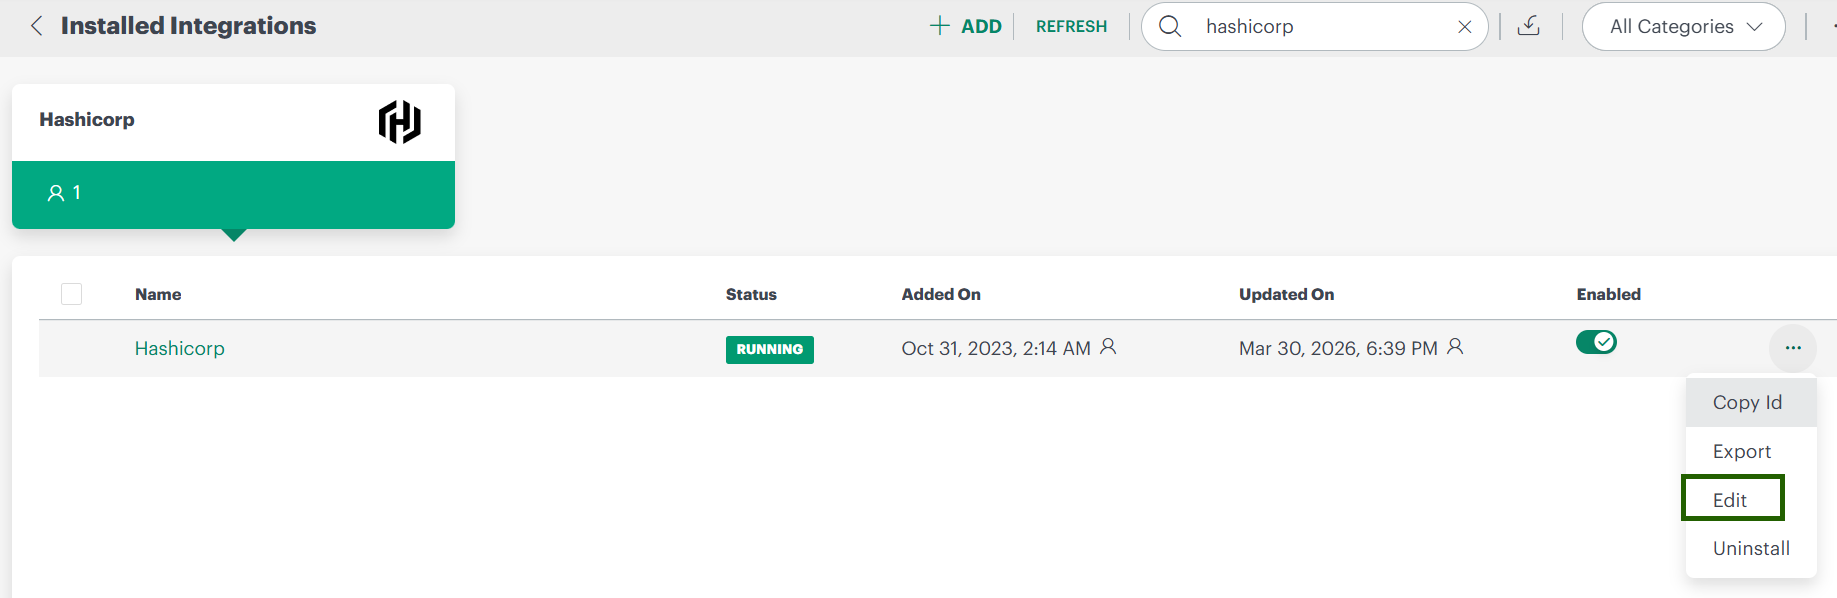
- Make the necessary changes.
- Click SAVE. The integration details are updated.
Copy Id
This option allows you to copy the integration ID.
Follow these steps to copy integration ID:
- Mouse hover over the integration and click the three dots (action menu).
- Select Copy Id.
Export
This option allows you to export the integration details in JSON format.
Follow these steps to export:
- Mouse hover over the integration and click the three dots (action menu).
- Select Export. The details are exported in JSON file format.
Uninstall
Follow these steps to uninstall the integration:
- Mouse hover over the integration and click the three dots (action menu).
- Select Uninstall.
Note: Uninstalling this integration is irreversible and if any metrics, resources, alerts, incidents and other dependencies on it will be impacted. - Provide the reason for uninstalling the integration.
- Click Uninstall. Un-installation will fail, if the credentials are already mapped to the vault.
The next step is to launch the console. To launch the console you need to provide credentials manually or use an already created credential set.
See Credentials for more information.
The next step will be to assign the credential to the resource.
Assign credential to resource
To launch the console, you have to first assign the credential to the resource.
See Assign a credential to know how to assign credential to the resource.
Launch a console
Follow these step to launch a remote session:
Click Infrastructure > Search.
From the Infrastructure search page, search for the resource(s) (from resource categories, resource groups, sites, or query) and select the resource or click anywhere in the row.
From the Actions menu, select Launch Remote Session.
Provide the required details in the Launch Remote Session slide-out:
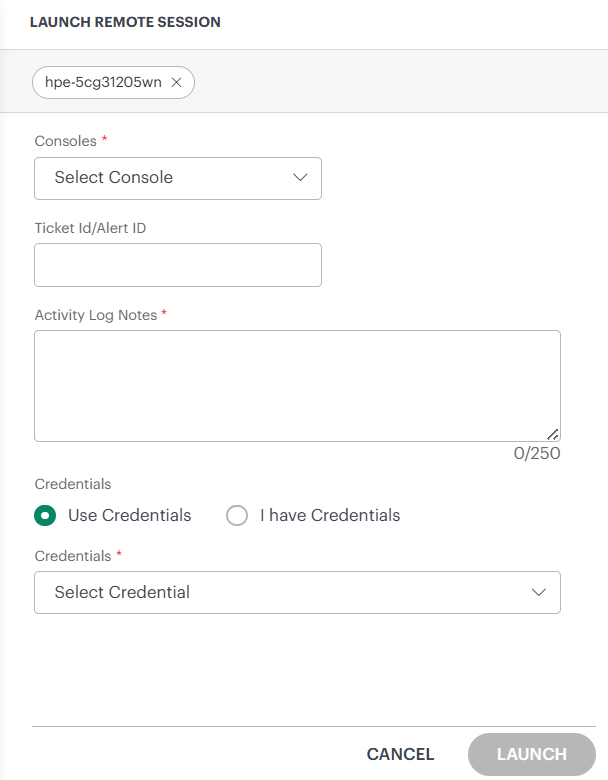
The Use Credentials option is selected by default. Select the credential from the Credentials dropdown list.
Enter the access token in the Access Token box. You can leave it empty if you have provided the token already during collector profile configuration.
Click Launch. The console will launch after fetching the credentials from the vault.